Pages

Thursday, January 28, 2016

Sugar Free/Gluten Free/Vegan Black Bean Cake

If you have always been too afraid to try black beans in a dessert before, then now is the perfect time for you to get over that fear. This sugar free black bean cake tastes just like a "normal" chocolate cake without all of the bad-for-you ingredients. The black beans substitute for the flour and NuStevia Simple Syrup is put in place of the sugar.

The cake is healthy, moist and tasty. I dare you to give it a try!


Sugar Free Black Bean Cake
  • 9 Tablespoons Water
  • 3 Tablespoons Flaxseed Meal
  • 2 Cups Black Beans
  • 2 Tablespoon NuStevia Simple Syrup
  • 2 Tablespoons Oil
  • 1/2 teaspoon Vanilla Extract
  • 1/2 Cup Cocoa Powder
  • 1 teaspoon Baking Powder
  • 1/4 teaspoon Salt
  • 1 teaspoon Baking Soda
  • 1 teaspoon Vinegar
  1. Preheat oven to 350 degrees.
  2. Put the water and flaxseed meal in the bowl of your blender and pulse a couple of times. Let sit a few minutes.
  3. Add all of the rest of the ingredients besides the baking soda and vinegar and blend until very smooth.
  4. Move batter into a medium size bowl and sprinkle baking soda over the top. Add the vinegar and fold in just until combined.
  5. Dump into a greased 8x8 inch pan and bake for 20 to 25 minutes.
-Bethany

Although NuNaturals sent me the products, all of the opinions and the recipe are by me.


Monday, January 25, 2016

Homemade White Chocolate Sugar Cookie Dough Ice Cream

I love white chocolate.

I love cookie dough.

And I love ice cream.

So, when I got the inspiration to put all three of those things into one dessert I couldn't help myself. And the results were fantastic.

Just look at this ice cream!


White chocolate pieces to go into the white chocolate ice cream...

And sugar cookie dough, of course. (I made a bit of it into balls, then took the easy way, as listed in the recipe.)

And here they both are in the ice cream.

It looks yummy, doesn't it?


And it doesn't just look yummy, it tastes it, too. This ice cream is rich, creamy and white-chocolate-y.


Don't let all of the steps scare you away from making this treat. You will be happy that you have taken the time (which isn't really all that long) to put it together when you taste that first bite of white chocolate goodness!

Sugar Cookie Dough
  • 1/4 Cup Butter, softened
  • 1/4 Cup Sugar
  • 2 Tablespoons Brown Sugar
  • 1 Tablespoon Milk
  • 1/2 teaspoon Vanilla Extract
  • 1/8 teaspoon Salt
  • 1/2 Cup plus 2 Tablespoons White Rice Flour
  • Sprinkles (optional)
  1. Mix together the butter and sugars. Add the milk and vanilla and mix again. 
  2. Add the flour and salt, stir. Add in the sprinkles, if using.
  3. Line a pan with a piece of wax paper. Form dough into small balls and set on the wax paper (or just press it all out into an 8x8 square and chop up once frozen). Freeze.
White Chocolate Pieces
  • 1/4 Cup White Chocolate Chips
  • Sprinkles (optional)
  1. Melt the white chocolate in the microwave, being careful not to burn.
  2.  Spread out into a thin layer on wax paper. Top with sprinkles immediately, if using.
  3. Cool in the fridge until solid and then chop into small pieces.
White Chocolate Ice Cream
  • 1/2 Cup White Chocolate
  • 1 (14 oz.) Can Sweetened Condensed Milk
  • 1 teaspoon Vanilla Extract
  • Dash of Salt
  • 2 Cups Heavy Whipping Cream
  • Sprinkles (optional)
  1. In a microwavable bowl, pour the white chocolate chips and sweetened condensed milk. Microwave just until is all melted, and stir together.
  2. Add the vanilla extract and dash of salt and allow to cool to room temperature.
  3. Once mixture has cooled, beat the heavy whipping cream until peaks form (between soft and solid).
  4. Slowly add in the sweetened condensed milk mixture, pouring slowly into whipping cream with the mixer running.
  5. Once combined, fold in the white chocolate pieces, cookie dough pieces and sprinkles and freeze for 6 hours or more.

I'm sure you and your family will enjoy it as much as my siblings and I did!
-Bethany

Thursday, January 21, 2016

7 Tips For Saving Money While Eating On The Gluten Free Diet

There are many reasons that someone may hesitate starting on the gluten free diet, but the price of the food that they will have to start buying does not have to be one of them. There are so many ways someone can save money when eating gluten free. Here are just seven ideas for anyone who is eating gluten free (or considering the diet) to try out.


7 Tips For Saving Money While Eating On The Gluten Free Diet:

1. Use Masa harina. As long as you don't have a corn allergy, make Masa Harina your best friend. It costs only a few dollars for a bag that is enough for 132 tortillas. It is a naturally gluten free product that you are going to want to have on hand at all times! With it you can make quesadillas, taquitos, enchiladas, enchilada casseroles, and so much more. Use a tortilla in place of a bun for a lentil sloppy Joe (I have). Use them in any creative way that you like. This is a cheap, versatile gluten free food that you should always stay stocked up on!


2. Eat beans. Make them yourself to save money. Eat chickpeas in a variety of chickpea salads for a healthy, cheap and gluten free lunch. Eat black beans on a taco salad. Use refried beans to fill tacos. Or use any kind of plain beans in place of flour in desserts. There are so many uses for beans, and you just can't go wrong with them!


3. Make your own baked goods. Never rely on store bought gluten free foods, or you will end up spending too much money. Instead, stock your pantry with the basics (I use mostly a white rice flour/cornstarch/xanthan gum combo) and make your own food when you get a craving for sweets. One of my favorite, simple recipes is my chocolate chip shortbread bars. You can whip them up quickly, and they taste great.


4. Eat naturally gluten free foods. Choose things like popcorn, veggies, or raisins to snack on instead of buying products that are made specifically to be gluten free. Make polenta (which when bought in bulk on Amazon.com is about $.16 per serving) for supper instead of noodles or pizza crust. Make burgers wrapped in lettuce instead of a bun. By choosing these kinds of ingredients, you will save yourself a lot of money.


5. Buy in bulk. Buying in bulk is the easiest way to save money on groceries, no matter what diet you are on. When you are eating gluten free, make sure to stock up on the essentials. Buy white rice flour, cornstarch, xanthan gum, masa harina, dried beans, popcorn, and any other gluten free foods that you enjoy in bulk. Just make sure that you are getting a good deal on the bulk items, and your wallet will thank you later.

6. Stock up your freezer. Bake items ahead of time and put them into freezer safe containers. Make bagels, cookies and more, and freeze them to use later. That way, you will always have something to eat, and you won't be tempted to go out and buy something expensive when you get hungry.


7. Plan your meals. Bring food with you when you are going out for the day. This will not only help you stay within your budget by ensuring that you will not be tempted to go out to eat, but it will also keep you from risking a gluten allergy by eating at a restaurant.


I hope these tips are able to help you out as you are eating gluten free!
-Bethany


Monday, January 18, 2016

Gluten Free and Vegan Chocolate Chip Mug Cookie

Sometimes it's really hard to wait for a fresh baked cookie. If you are hungry for one right now, and you don't want to have to go through the whole process of mixing up a dough and waiting for it to bake for 10 minutes, then I have a solution for you. This gluten free and vegan chocolate chip mug cake is perfect for any time when you want a quick, easy and delicious cookie fix.

Just mix all of the ingredients together, toss it into the microwave for a minute, and it will be ready to eat. I could go for another right now...

The only bad thing about this cookie is that it is so easy to make, that it is temping to eat over and over again! But since this is lightened up with applesauce in place of butter, and is gluten free and vegan, you don't have to feel too guilty about eating it.


Gluten Free and Vegan Chocolate Chip Mug Cookie
  • 1 1/2 Tablespoons Water
  • 1 Tablespoon Applesauce
  • 1/8 teaspoon Vanilla Extract
  • 1/2 Tablespoon Flaxseed Meal
  • 1 Tablespoon Sugar
  • 1 Tablespoon Brown Sugar
  • 1 Tablespoon Cornstarch
  • 3 Tablespoons White Rice Flour
  • A pinch Salt
  • 2 Tablespoons Chocolate Chips
  1. Measure all ingredients besides the chocolate chips into a mug. Stir together until well combined.
  2. Stir in chocolate chips.
  3. Microwave for about 60 seconds.
  4. Remove from microwave and be careful not to burn yourself. Enjoy!
Enjoy!
-Bethany

Monday, January 11, 2016

Gluten Free and Vegan Bagel Bread

This bagel bread is slightly sweet, and I make it in small slices that are perfect toasted and served with cheese. I also like to make croutons out of this bread and add them to salads for a perfect crunch.

Most recently, I made this bread for my New Year's Eve party. I cut it into thin slices, toasted it, and served it with the cheese tray. It was a big hit.

Here is it before it's baked...

And after.

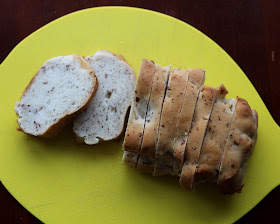
And this is what it looks like sliced.


Gluten Free and Vegan Bagel Bread
  • 3 Tablespoons Water
  • 1 Tablespoon Flaxseed Meal
  • 1/3 Cup Warm Water
  • 2 Tablespoons Sugar
  • 1 teaspoon yeast
  • 2 Tablespoons Oil
  • 1/2 Cup Brown Rice Flour
  • 2/3 Cup Tapioca Starch
  • 2 Tablespoons Potato Starch
  • 1 1/4 teaspoon Xanthan Gum
  • 1/2 teaspoon Salt
  1. Heat the 3 Tablespoons of water in the microwave and add to it the flaxseed meal. Let sit for 10 minutes.
  2. In another small, microwave safe bowl heat 1/3 cup water just until warmed but not too hot to kill the yeast. Add yeast and sugar and set aside for 5 minutes.
  3. Meanwhile, in the bowl of a stand mixer combine starches, rice flour, xanthan gum and salt.
  4. Go back to your liquid ingredients and add the flax-egg and the oil to the yeast mixture.
  5. Add the liquids to the dry ingredients and mix on low until combined. Turn mixer to medium and mix for 2 to 3 minutes more.
  6. Spoon batter evenly into two mounts on a parchment lined baking sheet. Form two loaves, roughly 5 by 2 inches, using wet fingers.
  7. Let rise for about half an hour. They will look a bit puffier, but don't expect them to double in size.
  8. Preheat oven to 350 degrees. Bake for 22 to 28 minutes. Cool, slice and broil before serving, or freeze for later.

Enjoy!
-Bethany

Wednesday, January 6, 2016

Gluten Free Chocolate Chip Whoopie Pies

Any kind of whoopie pies are delicious, but these treats that are a mixture of chocolate chip cookie and whoopie pie are extra special. Bake these up and everyone will be sure to love them!


Don't they look good enough to eat? 

I filled mine with chocolate buttercream, but you can use whatever you want. I'm sure marshmallow creme would be great.


Yum.


Gluten Free Chocolate Chip Whoopie Pies
  • 2 Tablespoon Unsalted Butter, melted and cooled
  • 2 Tablespoons Unsalted Butter, at room temperature
  • 3 Tablespoons Water
  • 1 Tablespoon Flaxseed Meal
  • 2 teaspoons Vanilla Extract
  • 1/2 Cup plus 2 Tablespoons Milk
  • 3/4 Cup plus 1 Tablespoon Rice Flour
  • 7 Tablespoons Cornstarch
  • 1/2 teaspoon Xanthan Gum
  • 1/2 teaspoon Baking Soda
  • 1/4 teaspoon Baking Powder
  • 1/4 teaspoon Salt
  • 1/2 Cup Brown Sugar
  • 1/2 Cup Mini Chocolate Chips
  1. Put two Tablespoons of the butter into a microwave safe bowl and melt.
  2. In another small bowl microwave the three tablespoons of water for about twenty seconds, then add the flaxseed meal to it and set aside for ten minutes.
  3. Preheat oven to 350 degrees.
  4. In a large bowl, combine the rice flour, starches, cocoa powder, xanthan gum, baking soda, baking powder, salt and brown sugar and mix under just small lumps of the sugar remain.
  5. Add both butters and mix into the dry ingredients with a fork until crumbly.
  6. Add the vanilla, flax-egg and beat.
  7. Add the milk and beat until the batter thickens and becomes elastic.
  8. Fold in chocolate chips.
  9. Line baking sheets with parchment paper and scoop by the tablespoon. Bake for 8-10 minutes.
  10. Allow to cool on baking sheet and then completely on cooling rack. Find pairs and fill with the frosting of your choice.
Enjoy!
-Bethany